Traverse Standard v11.0
Bill of Material
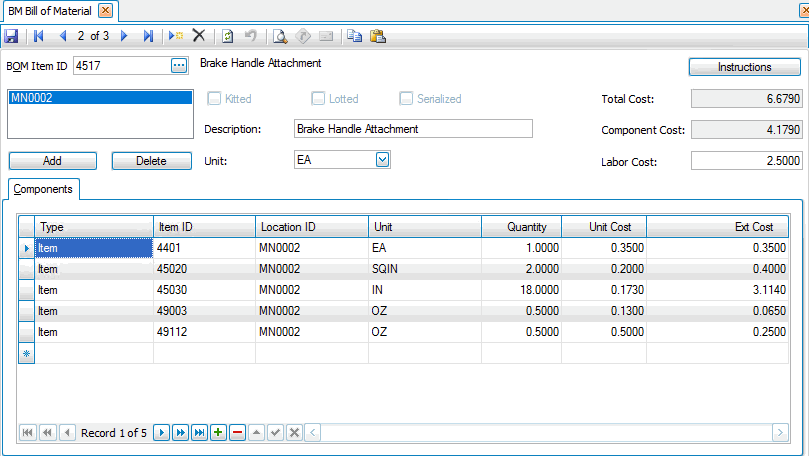
The Bill of Material function is the center of the Bill of Material/Kitting application: the bills of material you set up can be used to issue work orders to build or unbuild items, creating items for sale or restocking your inventory. These bills of material can also be used to set up pick lists for kitted items that are assembled when they are sold.
Bills of material record component and assembly information for inventory items. Before you can create a bill of material, you must first set up the assembled item and its component items in Inventory. Use the Inventory Items function to enter information about your assembly items and their components. You can then select these items when you build bills of material.
Creating a Bill of Material

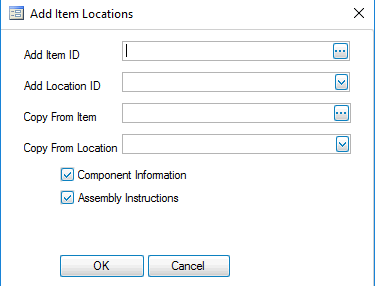
- Click the New button, on the toolbar, to open a new bill of material record. The Add Item Locations screen will appear.

- Select an inventory item from the Add Item ID field. This is the parent item for the bill of material.
- Select a location from the Add Location ID field.
- To copy item information from a similar record for a new item location, select the existing item record from the Copy From Item field. To copy location information from a similar record for a new item location, select the existing location record from the Copy From Location field.
- Determine whether to include Component Information, Assembly Instructions, or User Defined Fields (if available) by marking the corresponding check boxes; otherwise, clear the check boxes.
- Click OK.
Note: Use the Inventory Items and Item Locations functions, if applicable, to edit the item's location or description information, or to categorize the item as kitted, lotted, or serialized. - Accept or edit the Description for the bill of material item.
- Accept or edit the Unit of measure for the item.
- Enter the cost of labor in the Labor Cost field.
Note: The Total Cost and Component Cost fields automatically recalculate as you enter items. If a check mark appears in the Kitted check box, you cannot edit this field because kitted items do not have associated labor costs because assembly occurs at the point of sale. - Use the Add or Delete buttons to add or remove locations for the bill of material parent item.
Note: If you delete a location from a bill of material, it does not delete the location from the item record in Inventory. - Click the Components tab.
- Select a component item to add from the Item ID field.
Note: The item's location, unit, unit cost, and extended cost appear. If applicable, use the Inventory Items function to edit this information. - Enter the quantity used in the Quantity field.
Note: The Total Cost and Component Cost fields automatically recalculate when you edit this field. - Click the Instructions button, if applicable, to add assembly instructions to the bill of material. Click Close to save the instructions and return to the Bill of Material screen.
- Repeat Steps 7-9 until you have added all components to the bill of material.
Note: When items are selected, the Type will display as Item. When an item that is already set up as a bill of material is selected, the Type will update as Subassembly. - Click the Save button, on the toolbar, to save the new bill of material record.
Editing a Bill of Material
- Select a bill of material record to edit from the BOM Item ID field.
- Edit the fields as necessary.
- Click the Save button, on the toolbar, to save any changes made to the bill of material record.
Deleting a Bill of Material
- Select a bill of material record to delete from the BOM Item ID field.
- Click the Delete button, on the toolbar, to delete the selected bill of material record.
- Click Yes at the "Are you sure you want to delete selected record(s)?" prompt.
Deleting a Component
- Select a bill of material record from the BOM Item ID field.
- Place your cursor in the Item ID field of the component to delete.
- Click the Delete button on the navigation bar.
Deleting a Location
- Select a bill of material record from the BOM Item ID field.
- Select a location ID to delete from the location box.
- Click the Delete button.
- Click Yes at the "Are you sure you want to delete this record?" prompt.
Note: If you delete a location from a bill of material, it does not delete the location from the item record in Inventory.
Produce a Bill of Material List
Use the Bill of Material List function to produce a basic list of the bills of material you have created. Use the Bill of Material function to change bill of material information.